Baking and Curing Process of Liquid Coatings
After the liquid coating is reapplied to the weld area, a curing process is required to polymerize the coating. The protective effect of the reapplied coating is also affected by the curing temperature and duration. This is especially true for foods that are sterilized at temperatures of 121-129°C for 90 minutes, requiring the least amount of care in the curing process. The curing process consists of an oven and a conveyor belt. The conveyor belt transports the reapplied cans through the oven at a constant speed for a specified period of time. The hot air from the oven cures the coating, forming a chemically stable coating layer. Volatile solvents can be removed at both ends of the oven, as shown in Figure 3-82.
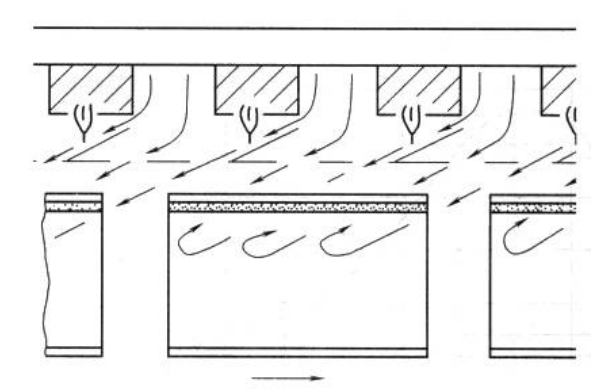
Figure 3-82 Schematic diagram of paint baking and curing
Two-Stage Baking Process of Liquid Coating Coatings
1. Solvent Evaporation Stage: A physical process where the solvent in the coating coating on the can weld area must fully evaporate before the solid components start to cure. If the surface begins to cure while solvent remains, trapped solvent can form bubbles, compromising the protective layer.
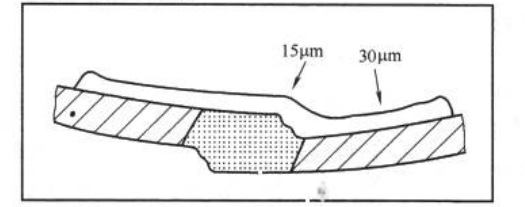
2. Coating Curing Stage: A chemical process where, after complete solvent evaporation, the solid content undergoes polymerization at high oven temperatures for 10–20 seconds (depending on coating type). Low-molecular compounds polymerize into high-molecular compounds, giving the coating anti-rust and corrosion-resistant properties. Post-curing coating thickness distribution is shown in Fig. 3-83.

Figure 3-83 Schematic diagram of thickness distribution of liquid coating strip after baking and curing
Experience shows that it takes approximately 1 second to bake a 1µm thick layer of liquid coating. Using an improved solvent formula, while maintaining the required tin melting temperature and preventing bubbles from forming, can reduce baking time by 30%. The initial curing curve for liquid coatings is the solvent volatilization phase, characterized by lower temperatures. The later stages are the curing phase, characterized by higher temperatures, as shown in Figures 3-84 and 2003-85.
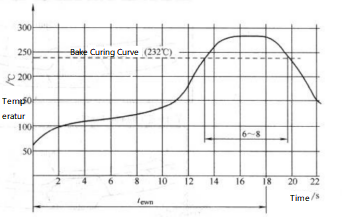
Figure 3-84 Heating curve for roller-applied liquid paint recoating
Temperature and time are important parameters during the baking process. High baking and curing temperatures can result in the following:
The paint layer is effectively cured.
Blisters are more likely to form during the touch-up coating.
Discoloration of the outer tinplate layer and scratches on the cans during transportation can be easily caused.
During the curing process, the baking time can be shortened.
The effects of baking and curing time are as follows:
Blisters are less likely to form during the baking process, resulting in a better curing effect for the touch-up coating.
This facilitates subsequent processes such as high-temperature sterilization.
The film thickness of the liquid paint layer is appropriately maintained.
The baking and curing equipment can operate at lower temperatures, which improves its lifespan.
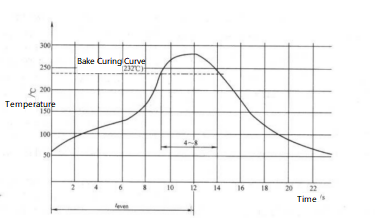
Figure 3-85 Baking heating curve for spraying liquid paint
During the recoating and baking process, the distribution of the paint stripe and the coating layer of the liquid paint can differ significantly from the ideal state, especially in the weld area, where the paint is thinner (see Figure 3-86).
Desired paint coating
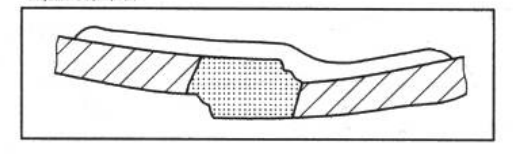
Paint coating in wet state
Actual paint coating in dry state
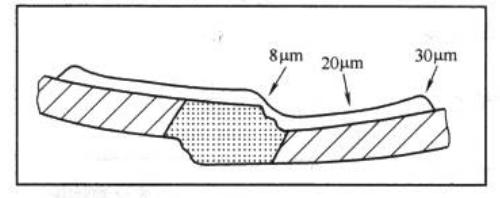
Figure 3-86 Thickness distribution of liquid coating strips under different conditions