Container Inner Wall Visual Inspection and Defect Classification
Appearance Quality Visual Inspection:
1. Visual Inspection of the Container’s Surface:
Check whether the container’s outer surface is smooth, free of rust, bulging, sharp angles, or mechanical damage that causes wear, deformation, dents, etc. Ensure the weld seam is smooth and even, without sand holes, rough tinning, solder buildup, poor welding, or perforations.
2. Check for Damage on the Printed Label:
Inspect the main graphic design and text on the external printed label to ensure no serious damage. For opened cans, check for defects like poor scoring.
3. Visual Inspection of the Rolled Edge:
Inspect the entire circumference of the rolled edge for issues like fake rolls, large collapses, quick mouth formation, “teeth” in the edge, iron tongue, edge cracking, jumping seals, incomplete rolling, double lines, and lip folding. For issues like lip folding and “teeth,” measurements may be necessary for detection.
Seal Integrity Testing:
According to GB 4789.26 can sealing test methods, the cleaned empty can is dried at 35°C and then subjected to both vacuum and pressurization leak testing.
1. Vacuum Leak Test:
Carefully fill the dried empty can with water up to about 80-90% full. Place an organic glass plate with an elastomer ring securely on the rolled edge of the can’s opening, ensuring a seal. Start the vacuum pump, close the vent valve, and press the cover plate with your hand to control the pumping, causing the vacuum gauge to rise from 0 to 0.069 MPa within 1 minute. Maintain this vacuum for at least 1 minute. Tilt the empty can and carefully observe the bottom lid, rolled edge, and weld seams for the presence of bubbles. If bubbles continuously form in the same area, this is considered a leak. Record the leakage time and vacuum level, and mark the leakage spot.
2. Pressurization Leak Test:
Seal the opening of the empty can with a rubber stopper and activate the air compressor. Slowly open the valve to increase the pressure inside the can while immersing the can in a water-filled glass tank. Carefully observe the bottom lid, rolled edge, and weld seams for the formation of bubbles. Continue increasing the pressure until it reaches 0.068 MPa, and maintain it for 2 minutes. If bubbles continue to form in the same area, it indicates a leak. Record the leakage time and pressure, and mark the leakage spot.
Sealing Structure Measurement and Inspection:
1. Inspection Areas:
Measurement of the rolled edge and sealing structure is performed at the three positions shown in Figure 5-12.
2. Measuring the Rolled Edge Width (W), Thickness (T), and Lip Fold at the Seam:
At positions 1, 2, and 3 in Figure 5-12, measure the rolled edge width (W), thickness (T), and the lip fold at the seam. At position 2 (opposite the seam), use a rolled edge cutting machine or a special saw to cut the rolled edge cross-section. Use a projector to measure the body hook (BH), cover hook (CH) length, and overlap length. Then, using pliers, carefully tear the rolled edge apart to check the tightness of the entire cover hook and the integrity of the seam cover hook. Finally, measure the body hook (BH) and cover hook (CH) length at positions 1 and 3, and perform a comprehensive evaluation.
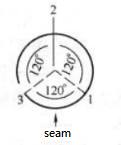
Figure 5-12 Inspection Locations
(3) Overlap length OL and overlap rate OL%
① Projection measurement method (arbitration method): Use a rolled edge projector to measure the values a and b of the rolled edge shown in Figure 5-13, where a is the overlap length (OL), i.e., the overlapping length of the cover hook and body hook; b is the theoretical overlap length. The overlap rate is calculated as (a/b) × 100%.
② Calculate OL and OL% using formulas based on the measured data.
OL=BH+CH+1.1te-W

In the formula: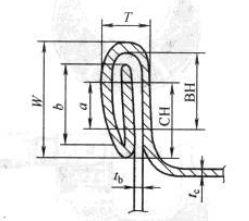
BH — Body hook width, mm
CH — Cover hook width, mm
te — Thickness of the bottom cover tinplate, mm
tb — Thickness of the can body tinplate, mm
W — Rolled edge width, mm
Figure 5-13 Measurement diagram of overlap length and overlap rate
③ Refer to the overlap rate calculation table based on the measured data.
(4) Detection of tightness (TR%) and seam cover hook integrity rate (JR%)
Use pliers to peel off the can lid along the edge, gently tap the entire circle of cover hooks, observe the wrinkling condition of the cover hooks, judge according to Figure 5-14, and comprehensively evaluate the tightness of the can container’s rolled edge and the integrity rate of the seam cover hooks.
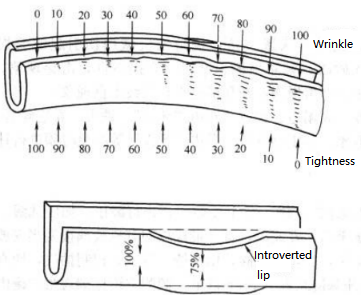
Figure 5-14 Classification of Tightness and Distribution of Seam Cover Hook Integrity Rate
Visual Inspection of Container Inner Wall Quality
Visually inspect the inner wall of the can container for coating peeling, inner glue flow, iron sulfide, sulfide spots, and oxidation rings.
Defect Classification
Defects are classified as severe, major, and minor defects according to current regulations.
Judgment Rules
Judgment of Visual Inspection for Appearance Quality
(1) Severe Defects: If one is found, the batch is judged as nonconforming. Rework and rearrangement are allowed, with two rounds of resampling inspection.
(2) Major Defects:
- For small cans, in a sample of 200 cans, acceptance criteria allow up to 6 major defects; rejection occurs if more than 6 are found.
- For large cans, in a sample of 80 cans, acceptance criteria allow up to 6 major defects; rejection occurs if more than 6 are found.
If judged as nonconforming, rework and rearrangement are allowed, with two rounds of resampling inspection.
Judgment for Seal Tightness, Seaming Structure, and Inner Wall Inspection
(1) Severe Defects: If any one severe defect is found, the batch is judged as nonconforming.
(2) Major Defects:
- For small cans, in a sample of 13 cans, acceptance allows up to 2 major defects; rejection occurs if more than 3 are found.
- For large cans, in a sample of 8 cans, acceptance allows up to 1 major defect; rejection occurs if more than 2 are found.
Severe defects and major defects are inspected on the same sample simultaneously. Once a severe defect is found, inspection for major defects should be stopped.
Minor defects are not counted but should not appear repeatedly